Building a Superior Custom Rotary Controller for Your Car
If you’ve ever spent time driving a modern BMW, you’ve likely encountered the iDrive system’s rotary controller. While innovative for its time, many drivers find the knob’s feel and responsiveness lacking. Inspired by this frustration, a maker known as Garage Tinkering set out to build a better version—one that not only feels great to use but also integrates seamlessly into a custom in-car system.
This article explores the steps, components, and design philosophy behind this DIY rotary controller, offering insights for anyone looking to upgrade their vehicle’s human-machine interface.
Choosing the Right Components
The foundation of any great build is selecting the right parts. Garage Tinkering chose the Crowpanel 1.28" rotary knob as the core of the project. This compact module combines a push-button rotary encoder, a round LCD screen, and an ESP32-S3 microcontroller—all in one convenient package.

The ESP32-S3 provides ample processing power and connectivity (Wi-Fi and Bluetooth), making it ideal for communicating with other vehicle subsystems. The integrated round screen allows for dynamic visual feedback, such as displaying current settings or vehicle data directly on the knob itself.
The Rotary Encoder and Push-Button
The encoder is a high-quality component that provides tactile, detented rotation. This ensures the user can feel each click when adjusting volume, temperature, or menu options. The push-button functionality allows for selection and confirmation actions, similar to the original iDrive but with improved haptics.
Designing the Enclosure
A 3D-printed housing was custom-designed to integrate the Crowpanel into the vehicle’s interior. The design includes a diffuser ring for the knob’s built-in RGB LEDs, which can change color based on mode or provide ambient lighting.
Additional buttons were added around the periphery for quick access to frequently used functions, such as toggling interior lights or switching display modes. The housing mounts flush with the center console, ensuring a factory-like appearance.
Printing and Assembly
The housing was 3D printed using a durable filament like PETG or ASA to withstand the car’s temperature variations. Post-processing included sanding and painting to match the vehicle’s interior trim. Assembly required careful soldering of the encoder, screen, and buttons to the ESP32-S3 board.
Functionality and Customization
The rotary controller serves as the primary human interface for a broader system that Garage Tinkering is implementing in his vehicle. This system includes a larger infotainment screen and multiple digital gauges. The knob allows the driver to switch between different controls, such as interior lighting, underglow LEDs, and display of vehicle parameters like battery voltage, tire pressure, or engine temperature.
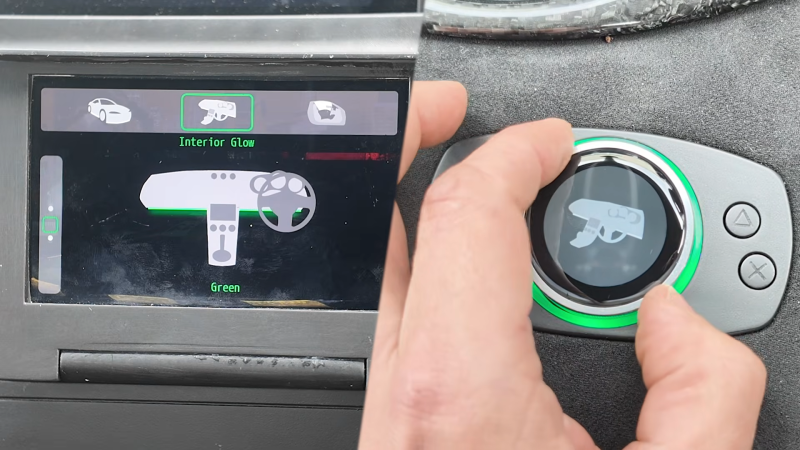
Because the system is fully customizable, every function can be tailored to the user’s preferences. For example, a short press might toggle the interior lights, while a long press opens a menu of gauge options. The round screen can show icons or text labels, making it easy to identify the current mode.
The Bigger Picture: A Complete In-Car System
This rotary controller is just one part of a larger custom infotainment and monitoring system. Garage Tinkering is integrating it with a standalone head unit and digital dashboard. The ESP32-S3 communicates via CAN bus or Wi-Fi to pull data from the vehicle’s OBD-II port and sends commands to control lighting modules.
This holistic approach is what makes DIY car electronics so rewarding. You can build exactly what you need, with no compromises. As we’ve seen in other great hacks—like the rad car data display that shows real-time metrics—there’s a vibrant community of makers pushing the boundaries of what a car’s interface can be.
Why Build Your Own?
The major advantage of building your own gear is that you can make it work exactly the way you want. No more wrestling with a poorly designed OEM controller. You get the ergonomics, feedback, and functionality you desire. And you learn a ton in the process.
Garage Tinkering’s project is an excellent example of how accessible custom electronics have become. With off-the-shelf components like the Crowpanel and 3D printing, anyone with basic soldering skills can create a polished, professional-looking interface that dramatically improves the driving experience.
Whether you’re looking to replace a frustrating iDrive controller or simply want to add custom controls to your vehicle, this project provides a solid blueprint. Start with the right components, design an enclosure that fits your car, and program the behavior to suit your needs. The road to a better automotive rotary controller is open to all.
Related Articles
- 4 Must-Attend Cybersecurity and AI Talks in 2026
- Mitigating the CVE-2026-31431 Linux Privilege Escalation: A Step-by-Step Guide
- How GitHub Swiftly Neutralized a Critical Git Push Vulnerability
- Ransomware in 2026: An Evolving Threat Landscape – Report Highlights
- 10 Critical Insights into npm Supply Chain Security: Attack Vectors and Defense Strategies
- How Russian Hackers Stole Microsoft Office Tokens Through Router Attacks: A Q&A
- Scattered Spider Leader 'Tylerb' Pleads Guilty in $8 Million Crypto Phishing Scheme
- Critical cPanel & WHM Authentication Bypass Exposes Millions of Servers to Remote Takeover